Remember . . . When you visit this BLOGs and you see a photo you like, just click on the photo to enlarge it.

Santa Rita Coffee Cake with Chocolate

Santa Rita changed their coffee bag from the gold on the right above, to the red. They included a bonus with the new package. On the back of the bag is a recipe for Coffee Cake with Chocolate.
So we had to try it out.
This is not a Canadian Recipe adapted to Brasil but rather a full Brasileiro Recipe that I thought you might like to try to prepare for yourself.
The recipe calls for uniquely Brasileiro measuring instruments. The mention a Tea Cup and a Coffee Cup so that is exactly what we used. The teacup is on the right, below, and the coffee cup is that tiny one on the left. The teacup is one cup in Canada but I am not certain of the equivalent in Canada of a coffee cup. It appears to be approximately 1/3 of a cup.
They also say use a soup spoon. In Canada that would be a Tablespoon. As in all recipes measurements are alway flexible to suit your taste.

They also say use a soup spoon. In Canada that would be a Tablespoon. As in all recipes measurements are alway flexible to suit your taste.
First you separate the yolks from the whites of the eggs. We use both so don't throw anything out.

The recipe calls for two eggs.

Add a cup of sugar.

Add 1/2 cup of butter.

Beat it until it is creamy.

Now add a glass of skim milk.

Plus 2 cups of wheat flour.

Now pretend you are a mixer and beat it all smooth.

Pour on 100g of semi-bitter chocolate.

Add 1 coffee cup of coffee. Of course the recipe calls for Santa Rita Coffee but maybe other brands will be satisfactory. *SMILE* Stir until completely smooth.

Now take the egg whiter and pretend you are a mixer again and beat them until they are white as snow.

Take an Angel Food Cake Tin and oil it lightly. Since we have chocolate in the recipe, oil is better than butter for this purpose.

Now add the yeast to the mix.


And stir, stir, stir.

Drop in the "snow" and stir gently until it disappears.

Add the mix to the cake tin.

Now it is ready for the oven.

Put the cake in a prewarmed average oven and bake for an hour or until a stick put in the cakes comes back out clean.

While the cake is cooking someone must clean the cake mix bowl. That time honoured tradition fell to Urso Branco. Notice the technique . . . use fingers, no spoons. Mmmmmmmmmmmmm!

Now if you are Brasileiro(a) have a brasileiro coffee while the cake cooks.

But if you are a Canadian (or American) have a real coffee. *SMILE* Maybe even 2 mugs.

Here is the finished Masterpiece.

The Master Tester approves!!!!

Note: The Pastry Chef was Judy and Urso Branco assisted a little while taking photos.
The Recipe on the Coffee Bag is written in Portuguese, of course, but here is the English Translation.
RECIPE - Coffee Cake with Chocolate
Beat the whites of 2 eggs until white as snow. Mix the egg yolks with 1 teacup of sugar and 1/2 teacup of butter and beat well until the mass is creamy. Add 1 cup of skimmed milk and 2 teacups of wheat flour. Continue beating per 10 minutes. Add 100g of semi-bitter chocolate (the recipe said melt the chocolate - we used powdered chocolate). Aadd 1 coffeecup of coffee and mix well. Later add 1 soup spoon of yeast in the mix and I beat quickly. Remove and add clear in snow, mixing delicately. Pour the mix in a cake mould that has been coated lightly with wheat flour. Bake in an average, prewarmed oven, for 1 hour, or until a stick in the cake comes out.
This English translation provides the correct details but not the colourful Brasieiro terminology.
Photos by Urso Branco
Read More and See More Photos ......
What could be better on a hot summer day than that old standby Potato Salad.
Potato Salad (Canadian style) is the first meal my mother taught me to make. Mother invented Potato Salad and it has become an International favourite ever since. Every Canadian Family makes this meal at least once a week in the summer!!
Here is how to make 100% genuine Canadian Potato Salad and all the trimmings. It is simple, economical and tasty.

The most important thing to know is, "Anything Goes!"
So first get some potatoes. I prefer the white flesh, light skinned variety call "New Potato" in Canada. I discovered a very similar potato in Brasil. Be careful not to use the ones for making mashed potatoes because they do not stay firm when cooked. See the recipe for Maionese Brasileiro later.
Peel the potatoes with your special peeler you must have bought by now if you have been following our recipes.

Cut them into small pieces so the cook faster. Don't cook so long that they crumble.

While cooking the potatoes boil some eggs. when done, put both potatoes and eggs into the refrigerator to chill them.

Cut up a variety of vegetables that you like. I select green onions (Spring Onions to some people). Cut them into tiny pieces. I also used green pepper, chopped.

Peel (thick) a cucumber. Then cut into tiny pieces like the onions above.

Notice the little dish in the background. We put half the veggies there and the rest in the bowl with the potatoes. A peeled chopped apple adds great flavour.

Mix the potatoes and veggies. Add mayonaise. Then garnish with paprika. It adds great colour.
Next chop up some cabbage, add the rest of the veggies froim the small dish, add mayonaise and garnish with paprika also.

Put the potato salad and the cabbage salad into back into the refrigerator to chill the mixes.
Slice up the cucumber you have left after you peeled it. Put it in a bowl with water and white vinegar mixed 1/2 1nd 1/2. Put it in the refrigerator also.
Next, take some fresh lettuce and lay it on a serving dish. Add sliced ham and tomato wedges.

Now you are ready to eat a fine summer meal. Delicious!

Recipe Variations.
Potatoes - use any type you like
Veggies - add any type you like
such as: Cucumber, Green Onions, Tomatoes, Peas, Corn, Cabbage, Carrots, Red Pepper, Green Pepper, etc.
Just be sure to chop them into small pieces.
Use whatever Mayonaise you like. I select very low fat, ultra light for health reasons.
The Cabbage salad is made pretty much the same way with the same ingredients.
Garnish with Paprika and sliced hard boiled eggs.
Add slices of ham or any cold cuts you prefer.
Let stand in the Refrigerator to blend the flavours.
Notice I did not include quantities of anything. It is all a matter of personal choice and availability. For example, in Canada, I used chopped Celery but we haven't found any locally in Brasil.
The quantity makes no difference to the recipe. Just make as much as you wish. Add amount of ingredients you feel you need. The amount shown here is suitable for one or two people.
Enjoy the meal. It is simple and very very good on a hot day.
Photos by Urso Branco
Read More and See More Photos ......
Here is what Christmas Dinner looks like in Canada.
Ever Canadian Family has this meal, exactly, almost, as shown here, maybe.
This meal was invented by my ancestors when they arrived in Canada in 1604 at Port Royal in Nova Scotia. There were plenty of wild turkeys to be had and the sage used in the stuffing was growing naturally in the wild.
The recipe calls for a turkey, some bread, some sage, an onion, roast or mashed potatoes and a few other items. Read this story and prepare for your next turkey dinner. Did you know that in Portuguese a turkey is called Peru? Turkey and Peru. What a coincidence.
Christmas Dinner in Brasil, 2007.

To begin, a few days in advance buy a turkey. If it is frozen thaw it out inside the fridge for three days and then wash it off before you start preparations at 8 a.m. Christmas morning.
The secret to success is to get a loaf of bread and dry it over night.

Cover it to keep flying guests off it.

Next morning gather the essentials and start cutting the bread into small cubes.

Put them in the turkey roasting pan. Every Canadian home has one!
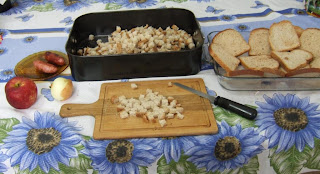
Chop or cut an onion (or two to taste) in small pieces and put them into the pan.

Now cut an apple in small pieces and throw them in the pan. Peel the apple but do not throw away the peel. We will use it later for a very special purpose,

Some people even add sausage to the mix. We added two today.

Now we add spices that we enjoy, especially sage. In Brasil use Maggi Fondor. We also added some black pepper.

Now we use the apple peels. We feed them to the poor starving chef! Hahahaha!

Now, as suggested in other recipes, it is a good idea to start by washing your hands because now you have to dig in and mix all ingredients by hand.

Now you takes hands full of the dressing and push it hard into all cavities in the bird.

If you were lucky the butcher who cleaned the turkey for you left decent skin flaps to close the cavities that are full of dressing.
Tie up the bird and put it on a rack in the turkey roasting pan.

Preheat the oven t0 325° F or 175° C then put the bird in the oven.

This one has one of those red popups that tells you when it is cooked.

OOOOPS! We forgot to cover it with aluminum foil.
Cook for about an hour per kilo. or 1/2 hour per pound. Uncover the bird for the last half hour to give it that rich golden colour.

By the way. We went a little overboard on the dressing. We had a little left over.

We put it in the fry pan with some margarine and cooked for about 20 minutes and ended up with a good supply of delicious Stove Top Stuffing. So never worry that you made too much.

Here comes the Master with his Masterpiece!

Now his next task is to carve the turkey for the assembled guests.

We had roasted potatoes, potato salad (Mayonnaise in Brasil), peas, rice, turkey gravy, and a host of other traditional Brasilian foods to go with this Traditional Canadian-Brasilian Christmas Dinner.
It all turned out to be a perfect meal. Now you try it. MMMMMMMMmmmmmmmmmmmm!
Photos by Urso Branco
Read More and See More Photos ......